

Release Files here:
https://github.com/Ghawken/HomeKitLink-Siri/releases/
Post issues or feature requests to github as below:
https://github.com/Ghawken/HomeKitLink-Siri/issues
Following on from Alpha and Beta testing which have finetuned some device support, and hardened a bit more against user error - hot on the heels of Indigo 2022.1 release here is a Beta release of HomeKitLink plugin. Download link as above.
This plugin (HKLS) aims to allow you to create HomeKit Bridges, which you add your indigo devices to and allows control from within Homekit and Siri control of your setup Apps.
The aim, and focus of this Plugin is to allow HomeKit to access Indigo Native devices - not necessarily to allow your Samsung TV which may have a plugin in Indigo, to then get into HomeKit. This - Into Indigo and then out to Homekit - is not the focus. If that is your aim I would suggest you run a homebridge instance somewhere - potentially on Indigo Mac and add whatever plugins are needed.
First install
Need Python3 supporting version of Indigo 2022.1+
Download latest and greatest indigoplugin file
Indigo 2023.2+ and Homekitlink version > 0.6.60: Double click and should be installed without needing any terminal commands.
I created and use the new pypi library (homekitlink_ffmpeg) to download the ffmpeg binaries we need, and Indigo now installs the dependencies.
(https://pypi.org/project/homekitlink-ffmpeg/)
& No requirement for running xattr commands after installing new version..
Limitations
Only one indigo device, once only, can be published to any HomeKit Bridge.
Each bridge has a maximum of 95 devices published within it. Currently this is not enforced. This is on TODO list.
Add new HomeKitLink bridge devices as needed to increase device count, or to manage devices
eg. Some users have a bridge per room for example.
Multiple bridges for the sake of it - likely best avoided, but shouldn't add to much overhead.
If you wish to publish seperate indigo devices but one physical device = no problem eg. motion, light sensors.
If you wish the exactly same device eg. 2 dimmer devices to be available in homekit - potentially under different names this is not possible without some simple help.
Simply use Masquerade plugin, or virtual devices and copy the device wished into a new device - use this new device within this plugin. Repeat as many times as wished.
Everything is user selectable - for example a physical light switch, can be a motion sensor, or occupancy sensor if you really want it to be - or a Doorbell linked to a camera stream that notifies you...
This leads to a bit of setup work, but once device is selected, and setup, saved, there should be no need ever to revisit.
These details are also saved within Indigo, so migrate and move with indigo without problem.
If you break HomeKit by your poor device option - in the normal course of events you simply remove the device from the HomeKit bridge and start again..
Important:
If you are changing a already published HomeKit device - eg. Switch to a Blind.
That will cause issues with the HomeKit app who will expect the old device.
You MUST remove the Switch device first, unpublish, Save, Save config and alllow bridge to restart.
Check in HomeKit app that the switch is gone (should just disappear...) and then readd again as new device type.
Quick, Basic Setup
Create a HomeKitLink Bridge device within Indigo - Create New, Select HomeKitLink and the Bridge type (there is only one option)
Select a Indigo device to publish on this Bridge to HomeKit.
For this simple example lets just pick a Light Device
Click the Checkbox Publish Device
Name the Device. This is the HomeKit name - Homekit automatically removes the Room name from front of device. Decide on your naming.
Select the HomeKit device Type. "Lightbulb". HomeKitLink will decide what type of Light your device should be automatically (from Color, to Dimmer, to switch only)
Please Button: Save Device
Indigo's log - will communicate that device has been published.
Please SAVE in the Device's Config Dialog. (This will stop, start the HomeKitLink Bridge)
Name your newly created HomeKitLink Bridge something e.g HomeKitLink Bridge Lights
- Go to HomeKit app in iOS device
Use you existing Home, or create a new one
Press the Top Left + button
Select "Add Accessory"
Go to HomeKitLink Bridge Device above "HomeKitLink Bridge Lights"
Edit the Device
Click the Show QR Code button.
This should open a Webpage with a QR Code
Scan this QR Code on the HomeKit iOS App.
Name and setup you Bridge and Light.
& Done.
This device should now be Setup within HomeKit
Siri - can control - turn on Light-name, turn on Room lights etc. Close/Open Blinds etc.etc
To add Additional Devices (up to 95 per Indigo HomeKitLink Bridge) go to Edit and repeat Step 2.
You can add as many devices as wished at once, before closing the Config Dialog and restarting Bridge with Save
Note:
When adding devices later to a existing bridge the new device just appear in the HomeKit app.
It appears in the Default Room of the Bridge.
Setup
Create a HomeKitLink ('HKLS') Bridge device.
Select the devices you wish to publish, and select what device it should be, enable Checkbox Publish and click save.
Repeat this as often as needed. Please SAVE within the Config Dialog when done.
Once Config Dialog SAVE is pressed the Bridge will be stopped and restarted. If this isn't need press cancel.
Here the options need explaining:
You can select any available HomeKit device (if Show-all selected) - for the selected Indigo Device
If you are setting up a sensor device - this is a device that returns sensor information to HomeKit - the plugin will give you an option of what deviceState to use.
Typically this should be sensorValue - this is the standard value of any sensor.
Sometimes if you are selecting a plugin device to be a sensor device
eg. piBeacon sensors, or RFXCOM plugins - you should choose the best state fitting the usage, but it must be compatible otherwise will not work.
To aid this choose the config menu will show the most recent value for this state.
Importantly for most On/Off Motion/Occupancy Sensors this should be true/False state.
Temperature/Humidity number values - must have JUST the number value - no degrees C or degrees F. Just 22.1
If in doubt check the device in question states to review. If problematic the plugin will display 0, and/or give an error, or worse case scenario the bridge will not update.
This is recoverable by removing the device in question from being published to Homekit.
In the aim of keeping the options completely open - you can select anything .... however it does require some inital device setup/thinking.
Examples
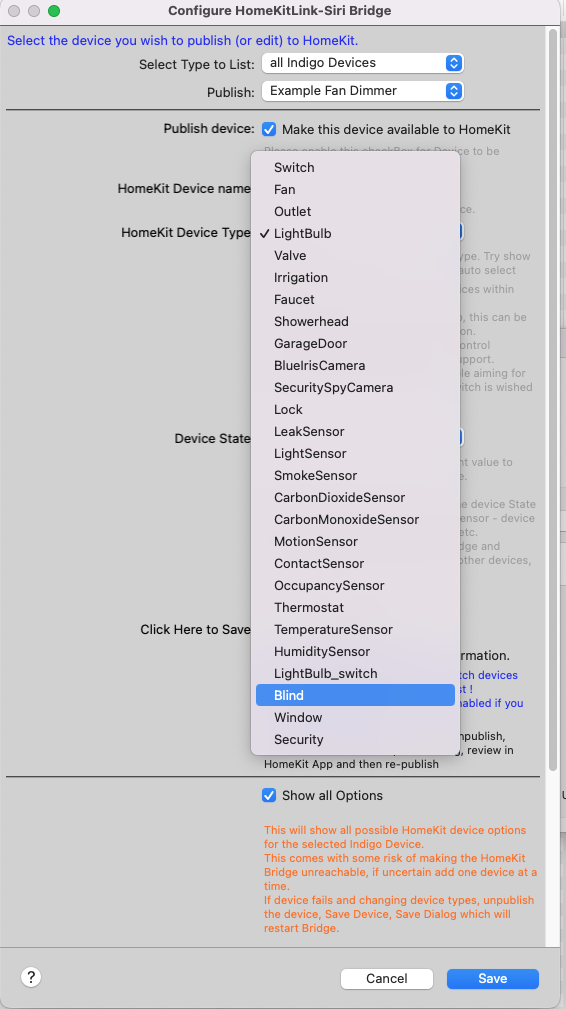
This is the HomeKitLink Bridge Edit Page.
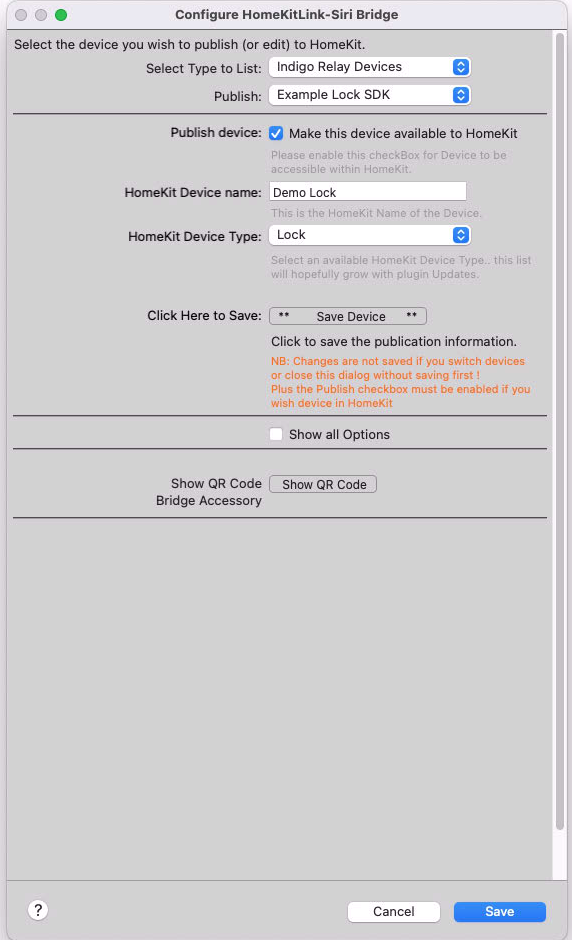
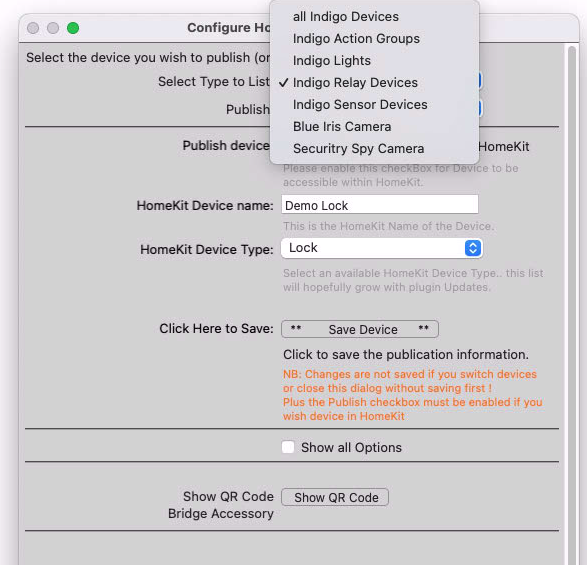
The first menu is a Indigo Device Selection menu -
all Indigo Devices lists ALL indigo devices.
Everything else just aims to shorten this list to devices you may be more interested in - eg. Sensors, or Lights etc.
This only makes it easier to find devices. These are duplicated in the all list - just harder to find if you have hundreds of devices.
The Show All Options option selection enables you to select any HomeKit device for the currently selected indigo device. (as per the warnings)
The Show QR Code button will show the QR code, for adding this bridge to HomeKit for the current HomeKitLink Bridge device.
The bridge needs to be running for this to function, so add devices, Save - check no errors and return to Show QR code.
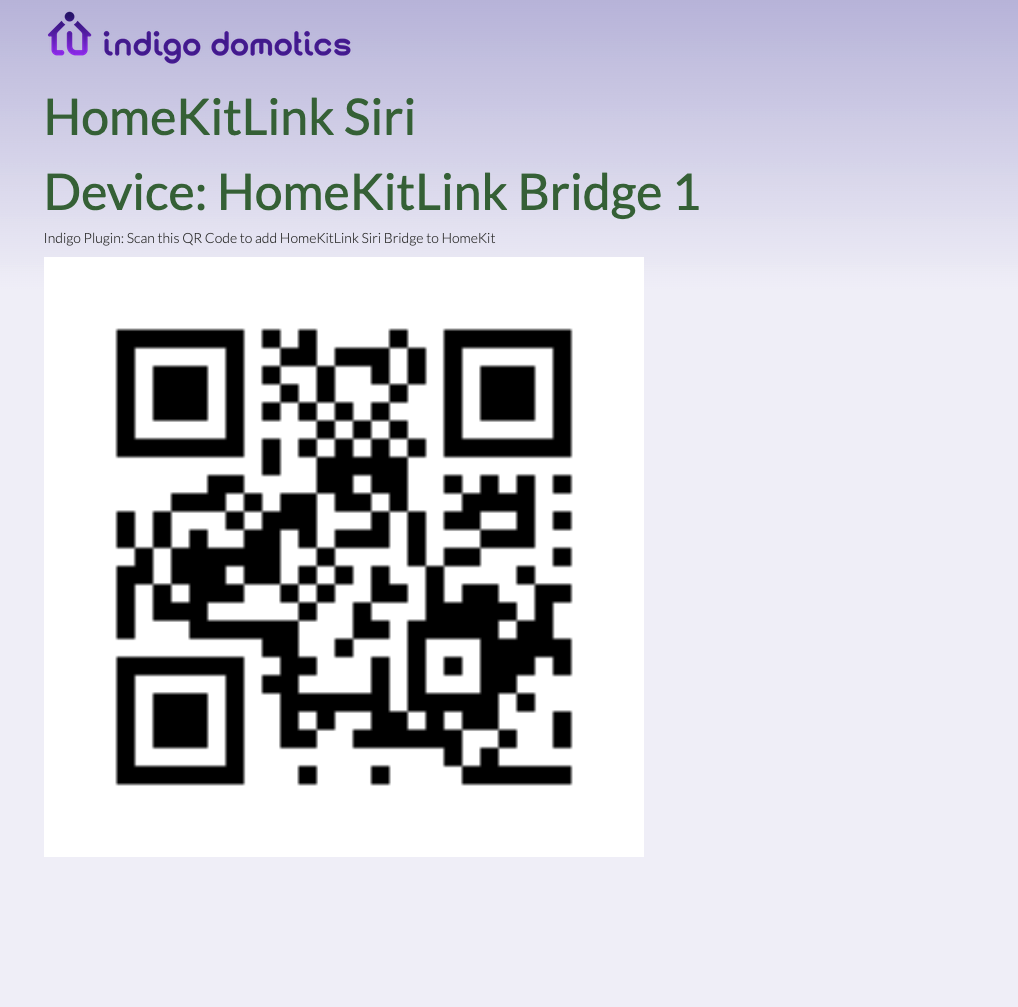
From within your HomeKit app:
Add Accessory - scan QR Code - and use this code.
THe Homekit App when then take your thorough the rest of the process.
It is important for device to be published to Homekit:
To enable the Publish checkbox, and click SAVE once all details have been entered.
Once this is done - the log will display info, and you can keep adding devices if happy are straightforward.
If you are adding a strange device, or pushing the envelope you should add one at a time and ensure works from within the HomeKit App.
If the device fails in HomeKit, unpublish in HomeKitLink Bridge and click save.
Important:
If you are changing HomeKit device - Light to MotionSensor that will be an issue.
Remove it first, Save, Save config and alllow bridge to restart.
Check in HomeKit app device is gone and then readd as new device type.
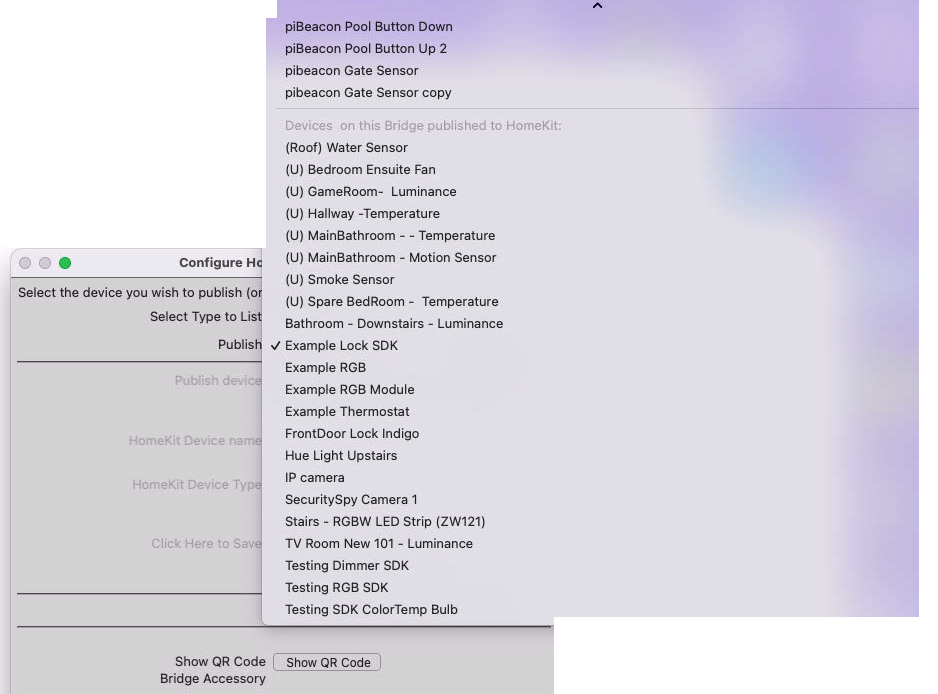
Below is an example of the device list menu - it shows devices published to this HomeKitLink Bridge, and greyed-out devices published to other HomeKitLink Bridges
To Edit the devices you need to edit the appropriate HomeKitLink Bridge.
Below are the currently supported device types. These are automatically guessed by HKLS, but can be selected by ShowAll option.
Most should be funcitioning close to 100%
The main supported cameras are BlueIris and Security Spy plugin cameras. BI is more smoothed out as far as its support goes.
When you select a Camera you can also add a DoorBell.
This DoorBell can be any Onoff indigio device. When this device is activated - HomeKit will show you the Camera stream with a notification that DoorBell was pressed.
For BlueIris the Cameras also are registered in HomeKit as Motion Sensors - and you can trigger act on these depending on your settings within the HomeKit App.
For Security Spy - we are hoping that a plugin update will also enable this function.
Other cameras - basically aren't supported, and you would be better off running a homebridge instance outside of Indigo.
Menu Items:
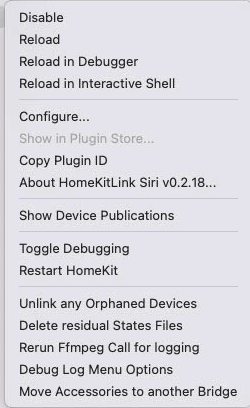
Show Device Publications
This shows in indigos log all current devices wished to be published to HomeKit.
Such as (updated since this photo)
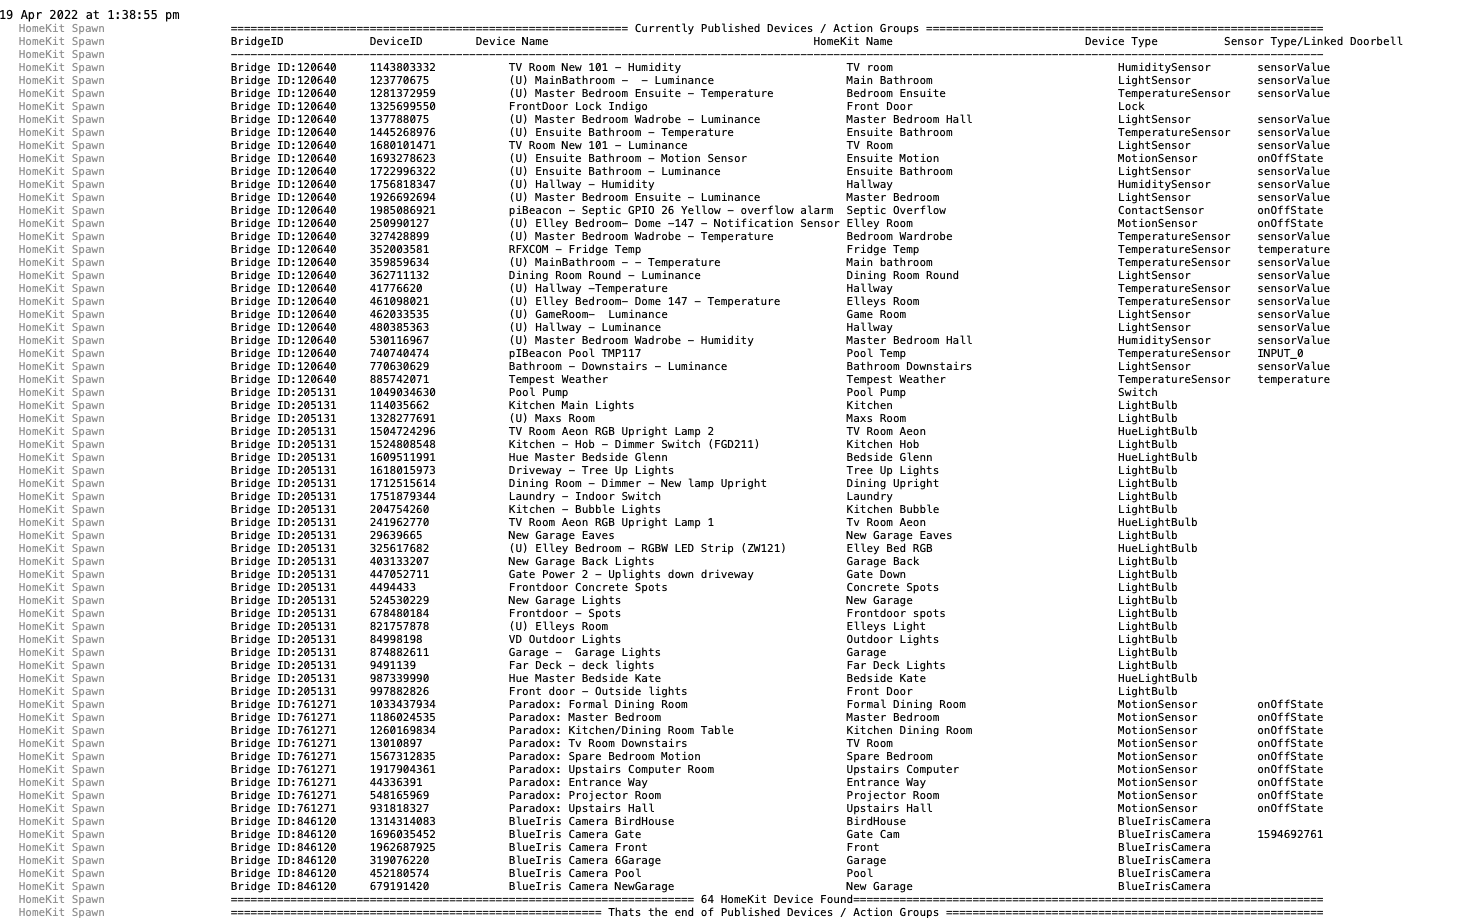
If HomeKitLink Bridge is disabled - will show as warning.
If HomeKitLink Bridge does not exist at all (deleted) it will show red
Unlink any Orphaned Devices
This will remove linkage for all/any devices whose bridge no longer exists
Rerun ffmpeg Call for Logging
This will run the last camera (uses ffmpeg) video stream command - use this to check for simple errors in displaying the camera stream
Debug Log Menu Options
Will display seperate menu with a number of debugging options, which hopefully won't be needed for most users
Move Accessories to another Bridge
This will copy HomeKit Accessories (all these devices we are publishing) from one HomeKitLink Bridge to another.
Use this if deleted a bridge and need to move old devices across to new.
Devices supported
Lights - dimmer/brightness/Color
Lightbulb: Should be the choice for all light devices.
Unless you wish a simple on/off device (even if brightness etc available) - in which case select Lightbulb_switch
Within the HomeKit can you can group Accessories together into one.
Fan (simple switch) and Fan V2
Plugin self decides.
If wish a simple Fan regardless of device - then select Switch and change within HomeKit
Switch: Within Homekit this can be changed to Switch, Fan
This is simply On/off device.
Action Groups default to this option.
Any onOff device within indigo should be supported.
Within HomeKit any switch can be displayed as a Fan, Switch or Outlet - simply select Icon and change.
Cameras:
Blue Iris - options come from the Blue Iris plugin, if you haven't installed this and you wish to use Blue Iris - you should. It enables Motion detection for each camera, live with HomeKit notifications, and Doorbell option exists for each camera.
eg. press Doorbell and get Notification and live stream click access.
Security Spy - camera streams, Doorbell can also be selected. Motion detection is pending some plugin changes if possible
Locks
GarageDoor
The below sensors are supported by Plugin.
The approach to Sensors is that this is user selectable. Technically you could make a Light Switch a Occupancy Sensor as everything is user selectable.
Occupancy Sensor
Valve
ShowerHead
Outlet
Thermostat
Largely supported. Main still be some fine tuning needed
Motion Sensor:
Temperature Sensor:
Humidity Sensor:
Contact Sensor
Above rules apply, either defaults to Sensorvalue or can select another state to be used..
Blinds
Windows
Both with option to reverse logic of closing. End On = closed, or On = open. Plus reversal of % closed. End 20% closed, or 20% open
Security Systems
(Beta only)
Security System is a slightly different entity to the above as it has no device within Indigo that is vaguely similar.
I have a added a reasonably extendable approach to security systems - so hopefully can add other Plugin devices as needed/reported.
Currently partially supporting VSS devices (basic security system device only), Paradox/Magellan/SP7000 alarm, and DSC Keypad.
This is not complete as testing devices is difficult lacking the actual hardware or ability to trigger.
Further Alarm systems should be able to be added.
When will this happen, feature be added etc?
Good question.
The aim, and focus of this Plugin is to allow HomeKit to access Indigo Native devices - not allow your Samsung TV which may have a plugin in Indigo to then get into HomeKit.
Into Indigo and then out to Homekit. If that is your aim I would suggest you run a homebridge instance somewhere - potentially on Indigo Mac and add whatever plugins are needed.
Currently
- all Indigo Relay Devices are supported
- all Indigo Dimmer Devices are supported as both Lights and Fans
- Speed Control devices supported as a Fan type
- all action Groups are support as Switchs/Fans/Outlets
- all Sensor devices; including plugins sensors (that are likely not anywhere except in Indigo) are supported
Bug fixing these devices and adding features will be the priority.
There is a bug / this doesn't work
Please add a issue to Github - and based on the above principals that will guide priority
This isn't the previous plugin HomeKit-Bridge plugin
Its quite different in its implementation and there is nothing underneath the surface doing the work except the plugin itself.
Requests that start with HomeKit-Bridge supported this, or did this etc.etc.... or the like will drop considerably in any prioritisation


